Child-friendly easy apple crumble pudding dessert

14 May

Want a quick, warming dessert for these cool autumn nights? This apple crumble is just about the easiest recipe you’ll ever make. As you can see from the photos I roped in Misses 4 and 6 and they did everything except using the oven. So put your kids to work and enjoy this dessert tonight. Continue reading

Red velvet cupcakes with cream cheese frosting

11 May

Image

I know – every blogger and her dog has done this recipe. That’s because these cupcakes are extra fantastic. It also helps that red is my very fav colour and they stand out from the pack.

There are many variations of this recipe and I used the most fabulous one from Joy the Baker. Her recipes are clear and concise and always work. 

Generally I’m not a fan of frosting [or icing as we all it in Australia] but when it comes to this cream cheese version I could eat my body weight. Sweet yet tart it is the perfect topping for these glorious little cakes.

Before you start ensure you have red gel food colouring. The cheap liquid stuff just won’t cut it and will leave a yucky taste in your mouth. It is availability from specialist cooking stores.

GATHER: 

4 tablespoons diced unsalted butter, at room temperature

3/4 cup sugar

1 egg

3 tablespoons unsweetened cocoa powder

2  tablespoons red food coloring

1/2 teaspoon vanilla extract

1/2 cup buttermilk

1 cup plus 2 tablespoons all-purpose flour

1/2 teaspoon baking soda

1  1/2 teaspoons white vinegar

LET’S GET TO IT:

 Preheat oven to 180C and line a 12 hole pan with cupcake wrappers.

In bowl of electric mixer cream butter and sugar until light and fluffy (about three minutes).  Increase speed and add the egg. Scrape down the bowl and beat until well incorporated.

In a small jug mix cocoa, vanilla and red food coloring to make a thick paste.  

Add to the batter, mixing thoroughly until completely combined.

With mixer on low speed slowly add half of the buttermilk then half the flour and mix until combined. Scrape the bowl and repeat the process with the remaining milk and flour. Beat on high until smooth.

Turn mixer to low and add baking soda and vinegar then increase speed and beat a few more minutes.

Place into wrappers and bake for 17-20 minutes/until a skewer comes out clean. Cool on wire rack, frost when .Image

Image

CREAM CHEESE FROSTING: I used this recipe from taste.com.au – it is fluffy and yummy: http://www.taste.com.au/recipes/23099/cream+cheese+frosting

ImageImageImage

Dark chocolate lace cookie biscuits

7 May

Image

I’ve come across these biscuits before with different names but I think the genius cooks at The Australian Women’s Weekly have bestowed upon these sweet morsels the best name: chocolate lace crisps. Once again this recipe is from their bible Bake.

I’ve made these many times and despite not having an overly sweet tooth I adore them. According to the notes I’ve scrawled in my cook book I first made them for a mother’s day picnic in 2010 and I made them recently for another picnic that was called off [due to bad weather]. In fact I love them so much that they are used as my WordPress image.

These are so delicious due to the dark chocolate so make sure you don’t use nasty compound stuff or they won’t taste anywhere near as good.

GATHER:

100g chopped dark chocolate

80g butter, diced

1 egg

¾ cup caster sugar [or even a smidge less]

1 cup plain flour, sifted

2 tablespoons cocoa powder

¼ teaspoon bicarb of soda

¼ cup sifted icing sugar

LET’S GET TO IT:

Place chocolate and butter in a medium sized pan and melt over a very low heat until glossy and smooth.

Remove from heat, allow to cool for about five minutes, then stir in sugar, cocoa, flour, soda and egg.

Place in fridge for 10-15 minutes or until mix is firm enough to handle.

Heat oven to 180C and line two baking sheets with baking paper.

Place icing sugar on a small plate.

Make a ball [about the size of a golf ball] with mixture, roll in icing sugar and place on baking tray.

Bake 12-15 minutes and cool on trays.

See my Hungry Mum column in Thursday’s Leader here.

Easy raspberry butter cake

4 May

Image

Image

Once again my trusty AWW bible, Bake, has provided me with a delicious, easy, can’t-stuff-it-up cake. I present the buttery and moreish raspberry butter cake that can be made with fresh or frozen berries [I always use frozen but never defrost them before use].

Thank you to the wonderfully wonderful Anna Warr for the gorgeous photos [http://www.facebook.com/AnnaWarrPhotography]

GATHER:

125g diced butter, softened

3/4 cup caster sugar

2 eggs

1 1/2 cups self-raising flour, sifted

1/2 cup milk

3/4 cup raspberries

LET’S GET TO IT:

Preheat oven to 180C and grease and line a round 20cm cake tin.

Butter butter and sugar in bowl of electric mixer until light and fluffy and then beat in eggs one at a time.

Stir in milk and flour in two batches.

Fold in 1/4 cup raspeberries.

Spread 3/4 of cake mix into pan and sprinkle with remaining berries then spread remainder of batter over the top.

Bake for between 45-60 mins [depending on oven]. Stand cake in pan 5 minutes, turn top side up onto wire rcak.

When cold sprinkle with sifted icing sugar and decorate with a few extra berries.

ImageImage

Mmmm, homemade pumpkin pie from scratch

1 May

Image

I adore pumpkin and love it in any incarnation. In Australia it is not really used in desserts but I know pumpkin pie is a true American tradition. Many moons ago I had pumpkin pie in Canada and loved it. I’d been wanting to make it for ages but most recipes seem to start with ‘one can of pumpkin puree’ – that’s not a thing in Australia.

The I stumbled across the magnificent book ‘Bake’ by pastry chef Alison Thompson and lo and behold – a pumpkin pie recipe. This book makes you want to stop everything and get into the kitchen to bake. Highly recommend it.

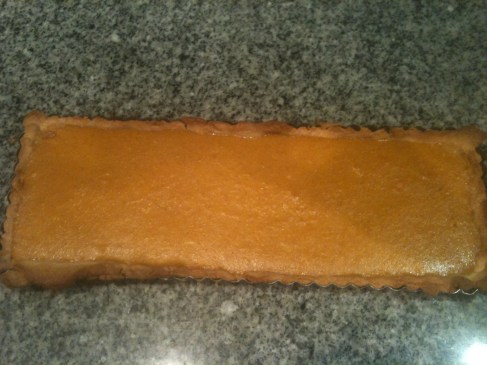
My iphone pictures do not do this delicious dessert justice. Note to self: use a better camera…

The pastry recipe is the easiest I’ve ever made [and I have a bit of a phobia about making pastry as it always seem so fragile and delicate but this is a hardy yet gorgeous pastry].

GATHER:

Sweet shortcrust pastry

225g sifted plain flour

60g sifted icing sugar

100g diced unsalted butter at room temperature

2 egg yolks

In the bowl of an electric mixer fitted with the paddle attachment combine the flour, icing sugar and butter. Mix on low speed until no lumps of butter are visible. Add the egg yolks and mix on low speed until the mixture comes together to form a dough.

Wrap dough in cling wrap place in fridge for at least two hours

Filling

1kg pumpkin, peeled and cut into small pieces

125mL pouring cream

3 eggs

60g brown sugar

60g caster sugar

½ teaspoon ground ginger

pinch of ground cloves [I didn’t have any so used nutmeg instead]

 LET’S GET TO IT

Make your dough. Leave in fridge for two hours.

Preheat oven to 170C.

Place pumpkin on baking tray, cover with foil and bake until pumpkin is very soft [Alison Thompson said around an hour, mine took about 1.5 hours. Maybe my pieces were too big].

While pumpkin is cooking take pastry out of fridge and allow it to come to room temperature.

Place sheet of baking paper on bench, unwrap pastry and using a rolling pin roll out to shape of non-stick tart tin with removable base [I used a rectangle tin approx 35cmx11cm]. Gently place in tart tin.

Place in fridge for half an hour.

Remove pumpkin carefully from oven [there may be water and steam] and place in bowl.

Increase oven temp to 180C.

Meanwhile place baking paper over pastry, fill with baking weights and bake until pastry is golden. Remove paper and weights and bake for a further 5 minutes.

Remove to bench; allow to cool for ten minutes.

Using a stick blender puree pumpkin until smooth and measure out 500ml of puree and pour into a bowl.

Whisk in cream, then the eggs, sugars and spices.

Pour into tart case, bake for 40 minutes until the filling is set.

Serve warm [or cold or eaten straight from the left over container at room temperature – it is amazing!]

ImageImageImage

Homemade strawberry jam with super easy scones [afternoon tea is ready!]

29 Apr

Image

I adore a tea – be it Devonshire, high or afternoon I think it is all wonderful. I would have been right at home in the Victorian era: nibbling on dainty sandwiches, sweet morsels and pillow soft scones. Ahhh, it is all about the scones. For as much as I adore a freshly made scone I’m not too fond of the mess they make of my bench tops. I’m not a clean freak but nor am I fan of scraping remnants of dough off my countertops.

But every so often the need for scones hits and when it does this easy peasy 3-ingredient recipe is the one I reach for. It is child’s play and produces light, floaty scones with a lovely colour. The recipe has been around forever so I’m not sure who to credit for it.

And what are freshly made scones without a real, fruity strawberry jam? I’d been wanting to make strawberry jam for ages but every time I bought the required two punnets of berries my fruit bat daughters would devour the lot. So last time I saw strawberries on sale I bought three punnets, cut one up for the fruit bat daughters then set about making this jam with fruit bat daughter number one. Having never made any type of jam before I picked an easy recipe from kidspot.com.au that called for it to be made in the microwave. It tasted amazing but I don’t know that it would have been any quicker than using the stovetop recipe. It made a sticky mess of my microwave but beauty is pain…

Miss 6 loved the fact we made & labelled our own jam. A gorgeous vintage label wold have looked waaaaay better than my slapdash attempt but I’ll remember that for next time.

EASY THREE INGREDIENT SCONES:

GATHER:

325g self-raising flour

2/3 cup cold lemonade

2/3 cup thickened cream

LET’S GET TO IT:

Preheat oven to 200C and spray a baking sheet with non-stick spray.

Sift flour into a large bowl. Combine lemonade and cream in a jug and pour to the flour bowl. Gently mix until just combined – it will be very sticky.

Tip onto a lightly floured surface and gently knead until about 3cm thick. With floured scone cutters or a glass cut out scones and place side by side on the tray.

You can brush the tops with a smidge of milk if you like but it isn’t absolutely necessary.

Bake for between 12 and 15 minutes/until pale golden. Serve warm with strawberry jam

and cream.

STRAWBERRY JAM

Image

GATHER:

Two punnets of strawberries, washed, hulled and roughly chopped

1 1/4 cups caster sugar

1/4 cup lemon juice

LET’S DO IT:

Put a saucer in freezer [you’ll need this to test the jam later]

Put strawberries, sugar and lemon juice in a very large and deep microwave-safe bowl.

Leave for 15 minutes to allow the strawberries to soften.

Place in microwave and cook on high for 4 minutes, stopping every minute to stir the jam to ensure sugar is dissolved.

Microwave a further 25-30 minutes on high, stirring every 5 minutes or until the jam reaches setting point. (To check, place a spoonful of jam on the cold saucer and place it in the freezer for two minutes. Run your finger through the jam and if it stays in two separate portions it is set.)

Leave to cool for five minutes then gently decant into a sterilised glass jar.

ImageImageImage

One bowl lemon bundt cream cake

26 Apr

Image

I have probably previously mentioned my affection for bundt cakes – I believe they are so much more pleasing to the eye than your everyday normal cake shape.

This lemon cream bundt comes, as so many of the recipes on this blog do, courtesy of the fab cookery folk at the Australian Women’s Weekly. This magazine [not a weekly any more] is renowned for their triple-tested recipes and I doubt there is a kitchen in this wide brown land of us that doesn’t have an AWW recipe in its drawers or stuck to the fridge. The recipe appeared in the book called Quick Mix Cakes which I suspect is no longer in print. If you do happen upon a copy I urge you to buy it – every recipe in it is super easy and delicious.

 GATHER:

125g room-temperature butter, diced

2 eggs

1  ½ cups self-raising flour

½ cup sour cream

150g caster sugar

grated rind from two lemons

LET’S GET TO IT

Preheat oven to 170C.

Grease a bundt pan, ensuring you get into all the nooks and crannies. I use non-stick spray and find that it works quite well.

Combine all ingredients into bowl of electric mixer and beat on low until everything is combined.

Increase speed until mixture is smooth and changed in colour.

Spoon the mixture into pan, ensuring you gently push it into the crevices of the design of the pan.

Bake for 40-ish minutes/until a skewer inserted comes out clean.

Cool in pan 10 minutes before gently removing to a wire rack.

When cold dust liberally with icing sugar.

 ImageImage

Easy chocolate cake recipe

24 Apr


simple chocolate cake

This is a one bowl, super easy, kid-friendly chocolate cake. It isn’t glam and won’t impress baking experts but for morning tea or a fast dessert you can’t beat it. If you can turn on an oven you can make this chocolate cake, which is great served with ice cream, cream or even just a sprinkling of icing sugar on top.

Making it in a ring baking tin makes it look a little bit more fancy than using a round tin. You could fill the berries to serve if you want to up the glam factor.

It is from a book called Quick Mix Cakes by AWW.

GATHER:

125g melted butter

2 eggs

1/2 cup milk

1/4 cocoa powder [Dutch for preference]

1 cup self-raising flour

3/4 cup caster sugar

dash best vanilla

Easy chocolate cake - The Hungry Mum

LET’S GET TO IT

Preheat oven to 170C, and grease a ring pan with non-stick cooking spray.

Place everything in bowl of electric mixer and beat until smooth and mixture has changed colour.

Pour into pan, bake 35-ish minutes/until a skewer comes out clean.

Leave in tin 5 minutes then remove to wire rack to cool.

Easy chocolate cake recipe  -The Hungry Mum


Anzac biscuits

21 Apr

These biscuits were originally made by the wives and mothers of Australian soldiers serving in WW1. They contain no egg so could be sent, via sea mail, to their loved ones on the front line. These Aussie classics are often made in the lead-up to Anzac Day [April 25] and should never, under ANY circumstances, be referred to as cookies. This recipe is from the always helpful taste.com.au but almost every Australian would have their own variation on a theme. Always use rolled oats, not instant.

Lest we forget.

GATHER:

1 1/4 cups plain flour, sifted

1 cup rolled oats

1/2 cup caster sugar

3/4 cup desiccated coconut [I used shredded for a change]

2 tablespoons golden syrup

150g unsalted butter, chopped

1/2 teaspoon bicarb soda

1 1/2 tablespoons hot water

LET’S GET TO IT:

Preheat oven to 170C and line two baking tray with baking paper.

Mix flour, oats, sugar and coconut in a large bowl.

In a small saucepan over low heat melt butter and golden syrup. Remove from heat.

Mix the bicarb soda with 1 1/2 tablespoons water and add to pan. Stir and add to bowl of dry ingredients.

Shape tablespoon-full of mixture and place on try, leaving space for spreading.

Cook for between 10-13 mins/until golden. Cool for a few minutes on tray before removing to wire rack.

These will keep for yonks in an airtight container.

Easy passionfruit melting moments

19 Apr

bakedbybelle-296

Is there a more melt-in-the-mouth creation than the melting moment? Buttery. Light. Scrumptious. Swoonworthy. These creations are always a hit and if you were to package them up in a pretty box and give to someone close to your heart they would be very appreciative, I’m sure. You can omit the passionfruit from the icing if it doesn’t float your boat and they will still be gorgeous. Continue reading